MikroTik RouterOS Packet and Connection Marking

Ever since I wrote the book, RouterOS by Example, I get a lot of emails asking me specific questions about this powerful routing system.  I try and answer the questions, time allowing, as completely as possible.  There is one question that seems to pop up from time to time so I thought it was worth dedicating a blog post to it.

I you are not familiar with the Mangle facility in MikroTik RouterOS, it is a system that allows you to identify traffic and mark it.  The identification criteria can be port, protocol, source address or destination address among other things.  Once traffic is identified, a mark is associated with the packet and that packet can then be queued, firewalled, nat’ted, etc.  to name a few uses.

The question was asked this morning, “Why does everyone suggest marking connections first and then marking packets? Wouldn’t it take less processor power to simply identify and mark the packets with one rule?  Good question so let’s explore that.

If you are in a hurry or have a very simple setup, or if for some reason you have connection tracking turned off, then you can simply mark packets without marking connections.  Although this is quick and dirty, it requires that the router examine every packet that passes through the router and determine if it meets our matching criteria of our one rule.  If you only have a few rules and it works the way you want, then this is probably fine.

For more complicated setups with many rules, this simplistic method will bring a small router to it’s knees by utilizing a huge amount of CPU.  In this case, the best strategy is to first identify the traffic and then mark the connections.

Once the connections are identified and marked, simply mark all packets that belong to that connection.  This is all about numbers so take a look at an example.  My home router currenty shows 118 connections and since I have started writing this post, it has processed more than 13,000 packets.  If you were marking packets only, then the router would have had to examine 13,000 packets to determine if there was a match.  I you use the two step method, it would examine less than 200 connections for a match and then mark only the assiciated packets.  Marking packets in itself is not processor intensive but examining them for a match is.  So, in this case, more rules means less resources.

There is a hidden benefit to marking connections first with respect to troubleshooting.  When you only mark packets, you don’t get a visual feedback about your effectiveness in rule writing.  Yes, the statistics for that rule will increase if you are matching packets, but there is no way to actually see the marks.  On the other hand, if you mark connections first, you will see those marks in the connection tracking table. For me, that in itself is worth the little bit of extra effort.

I hope this helps and happy mangling!


MikroTik, Ubiquiti and WISP Learning Center

This is an idea that has been long in the making, a single repository of technical information where you as a user can go to get the information you need quickly about MikroTik, Ubiquiti or other WISP topics.  Yes, most manufacturers have wiki’s but our is different because we post articles about the most often asked questions, tips and tricks we have learned as WISPs.  Check it out at wiki.ispsupplies.com.
Have a suggestion for an article?  Please let me know by emailing me.

Improved Ubiquiti airCam Mount From RFElements

If you have ever used Ubiquiti airCams, you know how powerful they are and how the low price point makes them perfect for almost any security application.  One area where we have seen some weakness is the mounting system.  I wrote about this briefly last month but now that we have these in stock and not just the prototypes, I thought it worth rehashing.
Although it fully articulates, the stock mount is not very strong and in high wind conditions, the camera will move causing false motion detection.

RFElements has a new product, the AbraCam Mount which makes these cameras extremely stable in outdoor environments.

The mounts come in three designs, all less than $15 each and they turn these powerful, low cost cameras into high end, professional looking and performing devices. As a test, I took 4 and installed them in Colorado in an area in the mountains that regularly experiences mountain winds coming off the continental Divide in excess of 100 mph.  The site was really getting weary from tons of false motion detects as the airCams swayed in the wind.  The results of the new mounts were great, no more false positives at all.  The cameras are rock stead and easy to adjust.  This is a hot product so come and get some before the first shipment disappears.

Ben Strahan Joins the ISP Supplies Team

I would like to welcome Ben Strahan, the newest member of our ISP team.  Ben will be handling both inside and outside sales and has many years of experience working in and with WISPs.   Like everyone on our team, he has built and operated a WISP and worked as a consultant.  He has great knowledge about licensed and unlicensed links and will be a valuable asset to our team.  You may reach Ben at 979-431-0304, extension 9208 or email him at [email protected].

MikroTik Announces 10G Fiber Support

Just when you thought a great product could not get any better, MikroTik has added 10G support for the first time, but in the most obvious place, their CloudCore Router line. The CCR1036-8G-2S+EM is their fastest router, now even faster with two SFP+ ports for 10G interface support (SFP+ module available separately). It uses the same 36 core Tilera CPU as the other CCR1036 model, and delivers the same performance, but now, ten gigabit links are possible. The device comes in a 1U rackmount case, has two SFP+ ports, eight Gigabit ethernet ports, a serial console cable and a USB port.  The CCR1036-8G-2S+ has two SODIMM slots, by default it is shipped with 4GB of RAM, but has no memory limit in RouterOS (will accept and utilize 16GB or more). Also available now, the EM model with 16GB of RAM. Nice!

MikroTik and the Heartbleed Exploit of OpenSSL

MikroTIk and Heartbleed, the official explanation:

All RouterOS versions are secure against the Heartbleed issue.

All versions prior to v6.12 used an unaffected, older version of OpenSSL, and since v6.12 the latest OpenSSL version will be used, where the heartbleed issue is already fixed.

We didn’t use any of the affected OpenSSL versions in any of our products, so no specific action is required on your side.

v2 until v6.11 (included) = secure because use an older OpenSSL version
v6.12 (and above) = secure because use a newer OpenSSL version

MikroTik RouterBoard Super High Power Links

If you had told me 5 years ago you had a link with more than 3 watts of power I would have assumed it was amped. Using power amplifiers with WiFi is an old idea, long since passed in today’s age of high power wireless cards and high sensitivity receivers. So, when I read the latest news from MikroTik, I was shocked to see they have a device that outputs more than 3 watts of power, 3.1 to be exact. The new MikroTik RBQRTG-2SHPnD is an integrated panel antenna and wireless card/motherboard all in one running RouterOS.  If you need a small footprint, long range device, I think you found it.

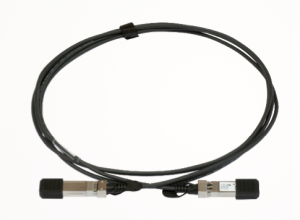
MikroTik Routerboard S+DA0001Speaking of innovative products, here is another one. A highly cost-effective way to connect two SFP/SFP+ devices (for example two units of CCR1036-8G-2S+) for very short distances, within racks and across adjacent racks, the MikroTik S+DA0001, an SFP to SFP device.  No patch cord needed, this is SFP modules and fiber all in one.  Interesting!


Improved Ubiquiti airVision Camera Mount

Th problem is simple: High winds + Ubiquiti airVision airCam cameras = shaky video or sometimes worse!

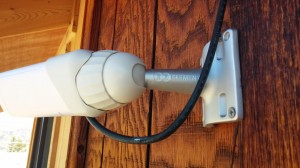
Ubiquiti airCam Photo

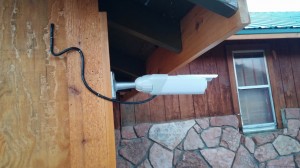
What’s that a picture of you ask?  Same thing I thought when I went to view one of the test cameras we had mounted at our cabin in Estes Park, Colorado.  There the winds routinely reach 75 miles per hour with gusts over a hundred.  At 7500 feet of elevation and just across the continental divide, this area next to Giant Track mountain is affectionately called the wind tunnel and the simple plastic mounts that came with the Ubiquiti airCam could not handle it.

Fortunately, RF Elements has a solution, the AbraCam mount.  This mount is constructed of cast aluminum and all weather plastic.  Other features include:

  • Seamless Camera Positioning using Ball Hinge
  • Quick & Easy Installation
  • Improved Picture Stability
  • Outdoor or Indoor Use
  • Wall or Pole Mounting
  • Cast Aluminum Bracket

Here is the Abracam mount in action:

RF Elements Abracam2 RF Elements Abracam

This mount is easier to use, looks more professional and should outlast the camera itself.  We have some on order and they should be in stock soon at ISP Supplies.  Reserve yours today HERE.


WISP Marketing 101

Marketing your WISP is the single most important thing you can do to grow your business. Ubiquiti has created a program that will kick start your marketing efforts by supply you with collateral materials customized for your company as well as investing in a marketing awareness campaign called the Ubiquiti World Network. “We’re running a national ad campaign to help WISPs compete with the phone and cable companies. Register to get listed and get free customized ads to build on that momentum.”

Step 1 – Sign up for the Ubiquiti World Network.

Step 2 – Begin small utilizing the yard signs.

We advise putting the yard signs in places where people are stopped, especially in the mornings on their way to work. For example, a major intersection where cars from a subdivision you can serve have to stop every morning on their way to work is excellent. Simply place the sign where the car stopped and waiting on traffic can see it. Remember not to put it too high, out of view but do not stake it to the ground or it will get damaged by mowers. Instead, we prefer to mount these yard signs (24″ x 18″ is a minimum and effective size) using roofing cap nails and nail them to a fence post or pole.

Step 3 – Door Hangers

Print out the door hangers and place one on the front door of every install with a hand written note saying something like thanks for being our customer. I circled our phone number in case you have questions. Also, hang one on each neighbor on tha street. It only takes a second and will pay big dividends.

Step 4 – More yard signs

At every install, ask the homeowner if you can put a yard sign in their yard for one week. Offer something of small value in return like a free month of service if anyone calls and mentions they saw the sign. Again, creativity will pay off in more installs.

Step 5 – More flyers

Spend a Sunday afternoon hanging door hangers on every home in a community you want to server. We always made it a family affair and paid the kids with ice cream while they did the footwork. Also, people are reluctant to be rude to kids when they walk onto their porch to hang the flyer.

Step 6 – Radio and TV

When your budget allows, consider a radio or television ad. Ads on the local cable channel cost much less than the larger stations. Always keep the ad simple, short and make sure you give at least two opportunities to contact you in the ad. Marketers call these “calls to action.”

This is the basis of a good start-up marketing plan. It isn’t based on textbook philosophies, but rather on what has worked for us and helped grow our WISP faster than we imagined.

Finally, remember the best marketing is word of mouth and doing a good job. Take care of your customers and they will send more leads your way than you could ever buy with your best marketing plan.

Upgrading Ubiquiti UniFi Controller On Linux

I have used the Ubiquiti UniFi product since it first came out and have watched the evolution with excitement because I believe the AP/Controller concept is the future of indoor wireless.

Ubiquiti has done it in their usual fashion by making powerful products affordable and UniFi is no different.  With UniFi, you need a UniFi controller in place to fully utilize the statistical and maintenance features that make it so different than anything else at this price point.

That being said, to truly get the controller cost down, you have to use Linux to avoid the Microsoft bloat and licensing costs.  If you aren’t using Debian or Ubuntu and have decided to roll your own with some other flavor of Linux like Centos, upgrading the UniFi software may not be totally obvious from the documentation so I will help you out.

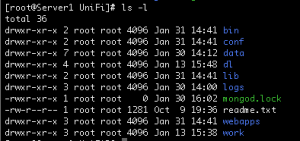
Assuming you are running Centos.  First, everything should be living in /usr/lib/UniFi. That directory should look like this:

UniFi-Server-Screenshot1

The important directory is the data directory, everything else is installed with the upgrade. Therefore, make a backup of the data directory however you wish, but I recommend using tar like this:

tar -zcvf data.tar.gz /usr/lib/UniFi/data

This will create a tar.gz file in the /usr/lib/UniFi directory.  Next you need to download the new UniFi binaries from Ubqiuiti. They are found HERE.

Because you have to accept the terms of their license agreement, using wget isn’t an option here so download to your laptop and then scp or ftp the zip file to your controller and place in the /usr/lib directory.  Change the current UniFi directory to something else like this:

# mv UniFi UniFi-old

Then, unzip the new version in the directory /usr/lib.  it should unzip itself as a directory named “UniFi”.

# cd /usr/lib
# unzip UniFi.unix.zip

When the unzip operation is done, change to the newly created directory and rename the data directory like this:

# cd /usr/lib/UniFi
# mv data data-dist

Then move your data tar file back to the proper directory:

# mv /usr/lib/data.tar.gz UniFi

Finally, restore your valuable data:

# tar -zxvf data.tar.gz

Unzip the file like this:

# tar -zxvf data.tar.gz

At this point you should be able to start the unifi controller and have an upgraded version with your old data still intact.  Good luck!