Introduction to building firewalls to protect your Mikrotik RouterOS device. One of the many key modules covered in the Mikrotik MTCNA + MTCRE Certification Training Course.
MikroTik Firewall Introduction Webinar
Reply

Introduction to building firewalls to protect your Mikrotik RouterOS device. One of the many key modules covered in the Mikrotik MTCNA + MTCRE Certification Training Course.
CAPsMAN is MikroTik’s centralized management system for WiFi AP’s. While not as sexy as some other out there, it has some unique features and a fairly robust interface that makes it a good choice for a lot of scenarios. There are a lot of CAPsMAN HowTo articles out there on setting up CAPsMAN but none that I found cover on minor detail that seems to trip people up every time and that is a CAP (An AP in CAPsMAN world) with two WiFi radios.=, now for 2.4 GHz and one for 5 GHz. I hope this tip helps you if your setup is not working.
If you came here looking for a HowTo, skip down and I will show you the simplest Dual BAnd CAPsMAN setup you can do with the least number of steps.
Again, there are many setup guides out there so assuming you came here because you followed one of these step by step HowTo’s and it is not working, here is where you likely fell short.
Click CAPsMAN and select the configuration Tab.

Most, if not all the guides I found only show one configuration here. If you do that, neither our 2.4 or 5 GHz radio will actually configure and begin broadcasting. In the CAP it will say that the wireless interface is being controlled by CAPsMAN but it will not broadcast or at least mine never did. To make this work with a dual band CAP you need two configurations here, one for 2.4 and one for 5 GHz. It is as simple as that. You tell CAPsMAN which configuration to use based on the wireless hardware supported mode selected, that is 802.11 a,b,g,n,ac etc.
In this example I created two configurations, one for 2.4 and one for 5GHz as follows. Again, I configured the least number of items to make a working setup with the least number of steps.


That is all for the 2.4 GHz config. The CAPsMAN controller will see the CAP capabilities and pick this config for the 2.4 radio. Then for the 5 GHz radio:


That’s it for the COnfiguration tab. Now, you need to tell CAPsMAN which radios to apply these configurations to and that is done by selecting the Wireless Hardware Mode to trigger the proper config. Since there are less properties, I can show these in a single screenshot.

Fill in only what I have show here. That should make your setup work!
Andrew Cox, one of our MikroTik Guru’s and a member of The BrothersWISP submitted another “gotcha” he has seen with CAPMAN default settings that can cause performance issues. Andrew wrote the default is “probably fine for house deployments where you’ve got no neighbors close by.. but in apartment complexes it’s horrible…here’s my template for channel config – keeps to the 3 main 2.4GHz channels and extension channel XX for 5GHz scans and picks the quietest for the primary 20MHz control channel.”
To add this restriction to your channel placement and sizing, in CAPsMAN on the Channel Tab:

Create two channel plans, one for 2.4 and one for 5 GHz. In Andrew’s example, he names them wlan1 (2.4) and wlan2 (5GHz).

Once the channel plans are created, they are applied in the Config tab:

Thanks for that tip Andrew.
Assuming you need more than a little trick to make your setup work, here is a step by step process to set up CAPsMAN. My goal here is to configure the least number of items to make a working setup with 2 different SSID’s, one for 3.4 and one for 5GHz. Yes, many of these configuration pieces can be set up as multiple policies and applied in a parent/child hierarchy but I wanted fast and simple and again, the least number of steps. I assume your CAPsMAN controller iw a working MikroTIk router (default configuration is fine) and the CAPs are also defaulted devices.
Assuming your Local Area Network is on a bridge named bridge, first create a datapath. This tells CAPsMAN where to add the CAP wireless interfaces.

Next, you will create two configurations, one each for 2.4 and 5 GHz. If you don’t have dual-band CAPs that is fine it will still work. I have numbered the steps to help you keep them straight.


Next you will create two provisioning setups that will apply the proper configuration to the proper WiFi radio.

Finally, make sure CAPsMAN Manager is enabled:

That is it for the controller.
Now to the CAP. In this case I am using a MikroTIk hAP ac Lite. I have the default configuration in place which means both wlan radios and ether2-5 are bridged together. All I need to do is enable the device as a CAP, tell it which interfaces will be controlled and tell it where to find the CAPsMAN controller (Discovery Interface):

Once you click OK, the wireless status on the CAP will change to this:

And, on the CAPsMAN Controller you will see the CAP appear with a state of “Run”:

You will see the two radios from the cap here:

And your laptop should see both SSID’s:

That is it! You should now have a working CAPsMAN setup to which you can add lots more CAPs and control them all.
My blogs have always been technical in nature. I see challenges faced by our customers and try to solve them using the products and technologies I know through my experience. This one is going to be very different!
For several years, I have had a relationship with an organization in North Carolina, Samaritan’s Purse. I have trained many of their technical staff in Boone, North Carolina, at my public training events and in their North Wilkesboro locations. The experience with this group has always been top notch. These guys and gals are dedicated to their jobs, and their attitudes are admirable, but more importantly, they all have a dedication to their God that influences everything they do.
This week I was fortunate enough to do yet another training at SP in North WIlkesboro. THis one was a bit different because I had the opportunity to tour their North American facility in which they have condensed other parts of their operation into one huge facility, a warehouse and office that feeds their resources into every corner of the world where they provide relief to those affected by natural disasters. This year they expanded their reach into the lives of our heroes, our warriors through Operation Heal our Patriots. What a great way to leverage the beauty of Alaska, by inviting our warriors up for a one week experience in the shadow of Denali, wives and husbands together experiencing nature, hearing the gospel, renewing their marriages and healing their wounds.
So many missions, and so many resources at their disposal, I was impressed with everything happening at SP. I took a ton of photos and watched many of their videos that describe and document the work they do. I wanted to share a few with you HERE.
If you want to learn more about Samaritan’s Purse or to make a donation, visit them HERE. To see a ton of videos documenting what they do, visit HERE. To see the photos I took, click HERE.
Can’t remember a device’s IP Address? Address Resolution Protocol (ARP) requests can be used by Wireshark to get the IP address of an unknown host on your network. ARP is a broadcast request that’s meant to help the client machine map out the host network. Learn more HERE.
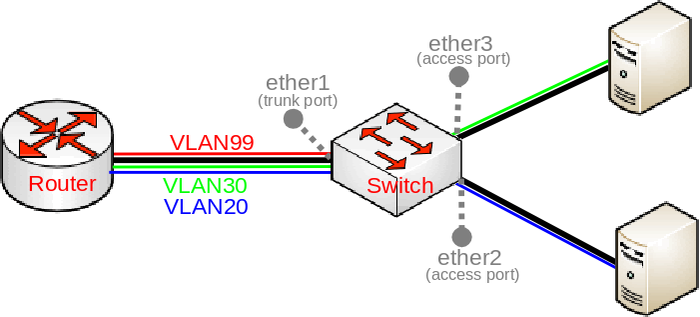
The switch menu and configuration interface is significantly different on the CRS3xx versus the CRS1xx or CRS2xx series switches and if you are trying to configure VLANs, the process is totally different. Here is a quick HowTo for configuring VLANs on MikroTik Switches such as the MikroTik CRS309 and similar.
Here is the setup we are trying to create:
Everything is set up through the bridge menu for the most part. Begin with the creation of the bridge and port assignments:
/interface bridge
add name=bridge1
/interface bridge port
add bridge=bridge1 interface=ether1 hw=yes
add bridge=bridge1 interface=ether2 hw=yes pvid=20
add bridge=bridge1 interface=ether3 hw=yes pvid=30
/interface bridge vlan
add bridge=bridge1 tagged=ether1 untagged=ether2 vlan-ids=20
add bridge=bridge1 tagged=ether1 untagged=ether3 vlan-ids=30
add bridge=bridge1 tagged=ether1,bridge1 vlan-ids=99
/interface vlan
add interface=bridge1 vlan-id=99 name=MGMT
/ip address
add address=192.168.99.1/24 interface=MGMT
/interface bridge
set bridge1 vlan-filtering=yes
The lines that people seem to skip over are:
/interface bridge
set bridge1 vlan-filtering=yes
Also, adding the VLAN ID on the access ports when you add them to the bridge don’t forget these statements at the end:
pvid=20
pvid=30
for the two access ports, in this example ether2 and ether3.
Remember that this example only works for CRS3xx series switches. if you have a 1xx or 2xx switch, it is still done through the /switch menu. Here is the same configuration for 1xx and 2xx switches:
/interface bridge
add name=bridge1
/interface bridge port
add bridge=bridge1 interface=ether1 hw=yes
add bridge=bridge1 interface=ether2 hw=yes
add bridge=bridge1 interface=ether3 hw=yes
/interface ethernet switch ingress-vlan-translation
add ports=ether2 customer-vid=0 new-customer-vid=20 sa-learning=yes
add ports=ether3 customer-vid=0 new-customer-vid=30 sa-learning=yes
/interface ethernet switch egress-vlan-tag
add tagged-ports=ether1 vlan-id=20
add tagged-ports=ether1 vlan-id=30
add tagged-ports=ether1,switch1-cpu vlan-id=99
/interface ethernet switch vlan
add ports=ether1,ether2 vlan-id=20 learn=yes
add ports=ether1,ether3 vlan-id=30 learn=yes
add ports=ether1,switch1-cpu vlan-id=99 learn=yes
/interface vlan
add interface=bridge1 vlan-id=99 name=MGMT
/ip address
add address=192.168.99.1/24 interface=MGMT
/interface ethernet switch
set drop-if-invalid-or-src-port-not-member-of-vlan-on-ports=ether1,ether2,ether3
I hope this post saves you some time and head scratching!

Yesterday I got tired of the nagging “Update Available” on my Ubiquiti Video NVR so I went through the upgrade process in the web GUI. It failed with Error 400. I tried several times, several browsers, same error. I then went to the CLI and attempted an apt-get update, apt-get upgrade, etc and no joy getting the new version of Unifi Video.
I then downloaded the latest version and attempted to install with dpkg and got this:

In addition, it removed my previous version and so my Ubiquiti NVR was dead in the water. I did some Googling and found many, many posts with all kinds of fixes, none of which worked. I began getting upgrade remorse, fearing I had forced too many upgrades and thoroughly corrupted my OS. Ugh. I then found this post and copy/pasted it verbatim.
apt-get clean
rm /etc/apt/sources.list
echo 'deb http://archive.debian.org/debian/ wheezy main contrib non-free' >> /etc/apt/sources.list
echo 'deb http://archive.debian.org/debian/ jessie-backports main' >> /etc/apt/sources.list.d/openjdk.list
echo 'deb http://archive.debian.org/debian/ jessie main' >> /etc/apt/sources.list.d/openjdk.list
apt-get update -o Acquire::Check-Valid-Until=false
apt-get install -y -t jessie-backports openjdk-8-jre-headless
rm /etc/apt/sources.list.d/openjdk.list
apt-get update
Whala! All of these commands actually ran without much error other than warnings and boom, Unifi loaded. The issue was my Java version and Wheezy was reluctant to upgrade past version 7, hence my earlier issues.
So, if you want to upgrade to version 3.10.5, expect some issues but this worked for me. Good luck!

This has been a dream for a long time, and a DIY project for those industrious individuals willing to cobble it together, but now it is a reality in a production device.
First of all why would you want to do that? Well, would you like advanced features at the customer location like Layer2 via EoIP or VPLS, rate limiting at the UE, advanced queueing, a more directional antenna and on an on, all the cool features we enjoy with RouterOS? It is here in the MikroTik LHG.
To make the LHG work with your Baicells eNodeB, first understand what it will not do. First, it will not show up in the CloudCore as a UE. So, to manage it remotely you will need to use an ACS with TR-069 or Unimus or some other management system. Secondly, some people have reported it will not connect to the base station as fast as other UE’s but the throughput speeds are generally better.
The only real configuration required is to insert a registered SIM card in the device and boot it up. There has been some debate whether or not the default APN has to be changed in the LTE setup. We have seen it work with no changes to the APN and other times the APN Name has to be changed to 1 . Some people claim you have to uncheck bands other than Band 43.
So, we are going to set one up here at our office and test it on our Baicells LTE network and post the results back here. If you have any experience, please email me through our Support System and let me know. I will include your experiences and comments here. Good luck!
I set up one here in our office. The only setting I made was to set the Band to Band 43 only. I used the default APN and it connected immediately. The one challenge I had was getting the SIM in correctly, it is not obvious. It did not work the first way I had it. I called Jim Bouse and he sent me his config which matched mine and so I tried flipping the SIM and it came right up. Here is how it goes in the slot:

Here are the property pages of my LTE interface:


I think this is a great setup!
Now available on the Playstore and the iPhone Appstore, the ISP Supplies App! With great features like a powerful search engine and a reorder list, it makes it fast and easy to place orders on the go.

We put a lot of time and effort into this app to make it easy to sue and hope you will enjoy it!
If you never used my web site https://mikrotikconfig.com to build firewalls and QOS, you have been working too hard! I recently (today) updated the database of IP addresses by Country to generate MikroTik IP Address Lists by country. Check it out!
UPDATE: 12/31/18 With the help of Google, I wrote a bash script to automatically update the lists daily!
Several vulnerabilities and exploits have recently plagued MikroTIk users. Specifically, these vulnerabilities affected the RouterOS webfig configuration interface, if no firewall was put in place to protect it. Granted, you can be critical of MikroTik but after all, running without a firewall is a user problem not a MikroTik problem.
MikroTik fixed the vulnerability in the following RouterOS releases:
The vulnerability in question was exploited by several malicious tools and affected users of RouterOS who had not upgraded RouterOS above the mentioned versions, and had opened the www service port (TCP port 80) to untrusted networks.
Many users may have unknowingly had their credentials compromised BEFORE their router was upgraded, but not yet actually hacked. This means many upgraded and thought they were completely safe until a few weeks ago when strange behaviors may have been observed. Specifically what we have seen is IP blacklisting by game sites like Playstation and XBox, slow speeds, inability to manage the router and so on. The telltale sign of this hack is viewing the system log and it is only one line long. If this has happened to you, the best solution is to clean up the config to remove the hack, export the config, check the config closely and then Netinstall the router and import the config. Again, this is the most drastic but the safest approach. Here are the things we have seen done by the hacker you will need to clean up:
/system logging
Reset it to 1000 lines

/ip firewall filter
Remove this rule and enable your drop rule if disabled

/ip socks
Disable it

/system scheduler
Delete any scheduled entries you didn’t add. Look for one that starts a script named “port 54321”
/system script
Delete this script

/system users
The hack adds a user “system”, delete that

I saw one router thad had a ppp user added. I can’t remember the user name but check that as well.
Those are the things we have found in many routers so get your routers cleaned up, change the passwords, add a real set of firewall rules (http://mikrotikconfig.com is a good place to star) and be safe.