MikroTik Wireless CAPsMAN Howto

I was intrigued by the recently new feature being developed by MikroTik called “CAPsMan”.  From the wiki “Controlled Access Point system Manager (CAPsMAN) allows centralization of wireless network management and if necessary, data processing. When using the CAPsMAN feature, the network will consist of a number of ‘Controlled Access Points’ (CAP) that provide wireless connectivity and a ‘system Manager’ (CAPsMAN) that manages the configuration of the APs, it also takes care of client authentication and optionally, data forwarding.  When a CAP is controlled by CAPsMAN it only requires the minimum configuration required to allow it to establish connection with CAPsMAN. Functions that were conventionally executed by an AP (like access control, client authentication) are now executed by CAPsMAN. The CAP device now only has to provide the wireless link layer encryption/decryption.”

When I initially read that, I immediately thought of UniFi, Ubiquiti’s centrally managed enterprise wireless platform.  From that point forward, I spent little time learning the facts and immediately began comparing the product to UniFi only to find I was disappointed with CAPsMAN and why wouldn’t I be?  It had no web interface, no fancy graphs and seemed difficult to configure.  I was wrong.  I am not saying there is eye candy, because there isn’t but it’s beauty is in it’s innovation, and function over form.  Best of all it can be built using existing, already deployed hardware, thereby using software to redefine your wireless network.

In summary, the CAPsMAN concept involves using your existing internet router (must be a MikroTik of course) and adding the optional CAPsMAN package.  Then installing theCAPsMAN package on the AP devices.  Conventional AP’s become CAPs and the router serves as the CAPsMAN controller and you are off to the races.  Each CAP becomes simply an interface on the router.  An interface you can bridge, address, route, whatever, treat it like any other interface.  Want to know who is associated with a certain AP?  Check the main CAPsMAN registration page.  There is one page that summarizes all CAPs!  Want to add a secondary or third ( I don’t like the word tertiary) , easy, just add it in CAPsMAN and it pushes the config to all the CAPs.  Same thing with adding a new WPA key, click once, type, click ok and done, all CAPs get configured automatically.

Hopefully I have wet your appetite enough for you to dive in and try it so here is a step by step to get you going.   Everything else is a modification of this basic setup.

CAPsMan HowTo

First, you must install thee CAPsMAN wireless package on the router and all AP’s.  If using CAPs, this is already done for you.  However, must CAPs come with CAPsMAN version 1 and you want version 2 so download it from MikroTIk.com, drag the file to your files window and reboot all devices.

CAPsMAN Router

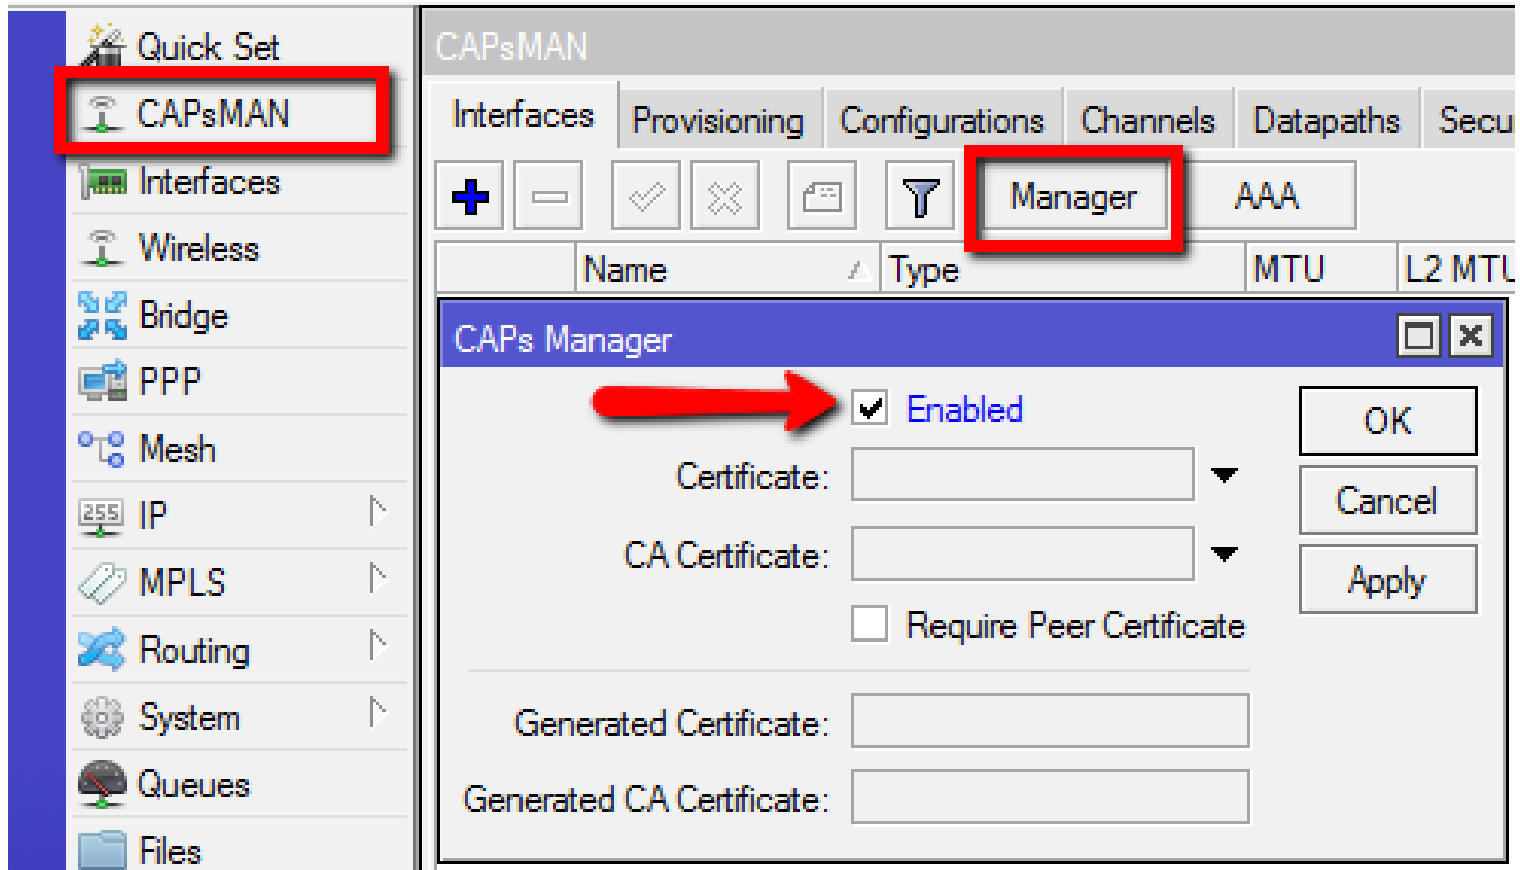
Once the router has the CAPsMAN package, open Winbox and enable the CAPsMAN manager service.

CAPsMAN Server1

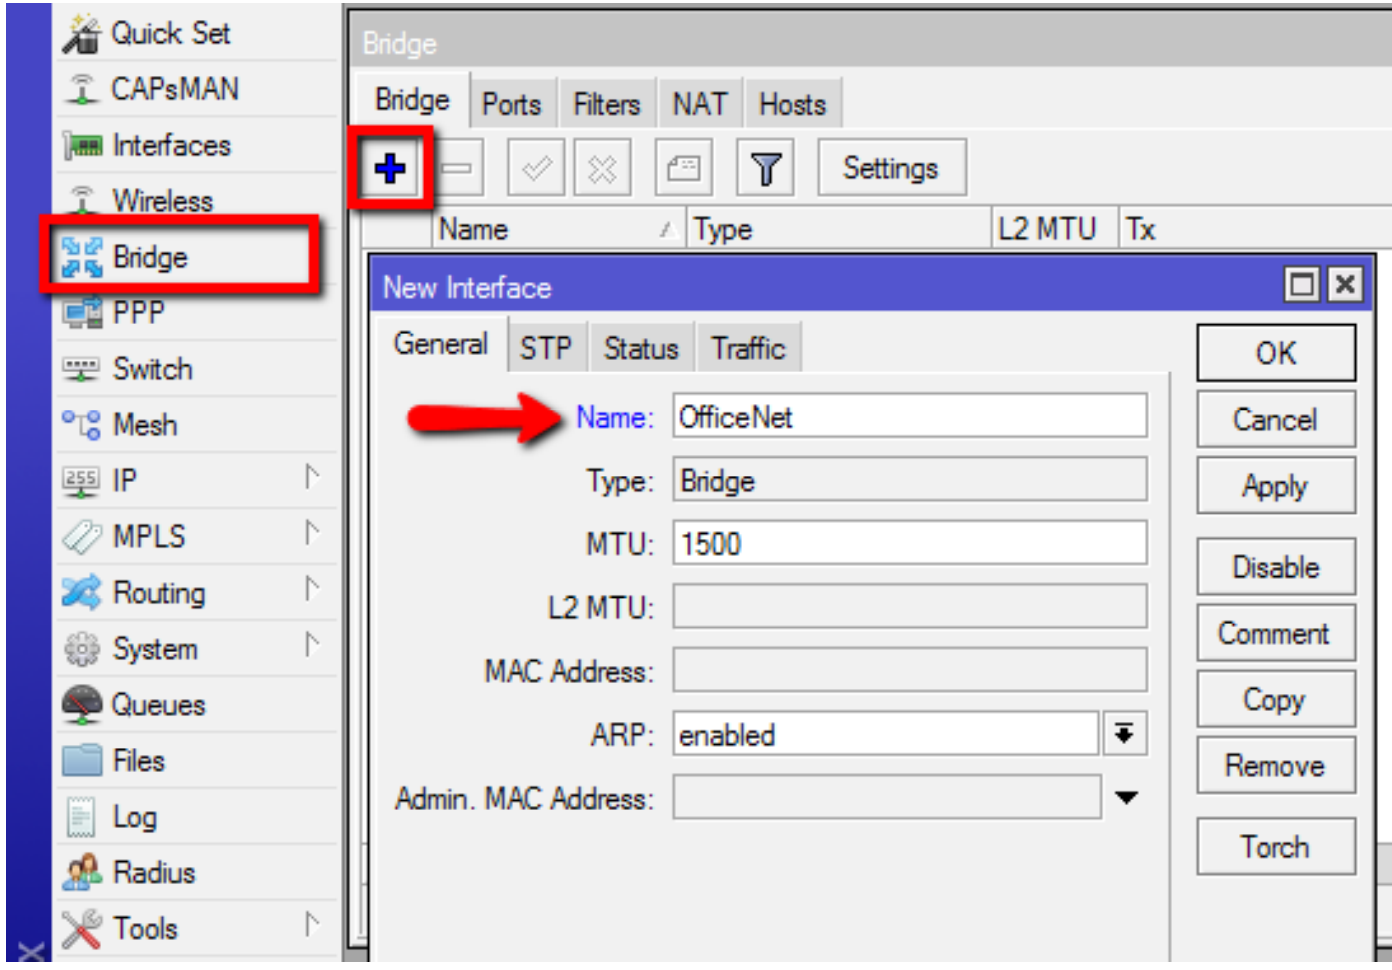
Next create a bridge interface for the CAPs to be added to dynamically when they appear on the network.

CAPsMAN Server2

Add an IP address, DHCP Server and a NAT rule.  You can learn how to do this elsewhere, like wiki.mikrotik.com for example.

CAPsMAN Server 3

Add a new CAPsMAN configuration.

CAPsMAN Server 4

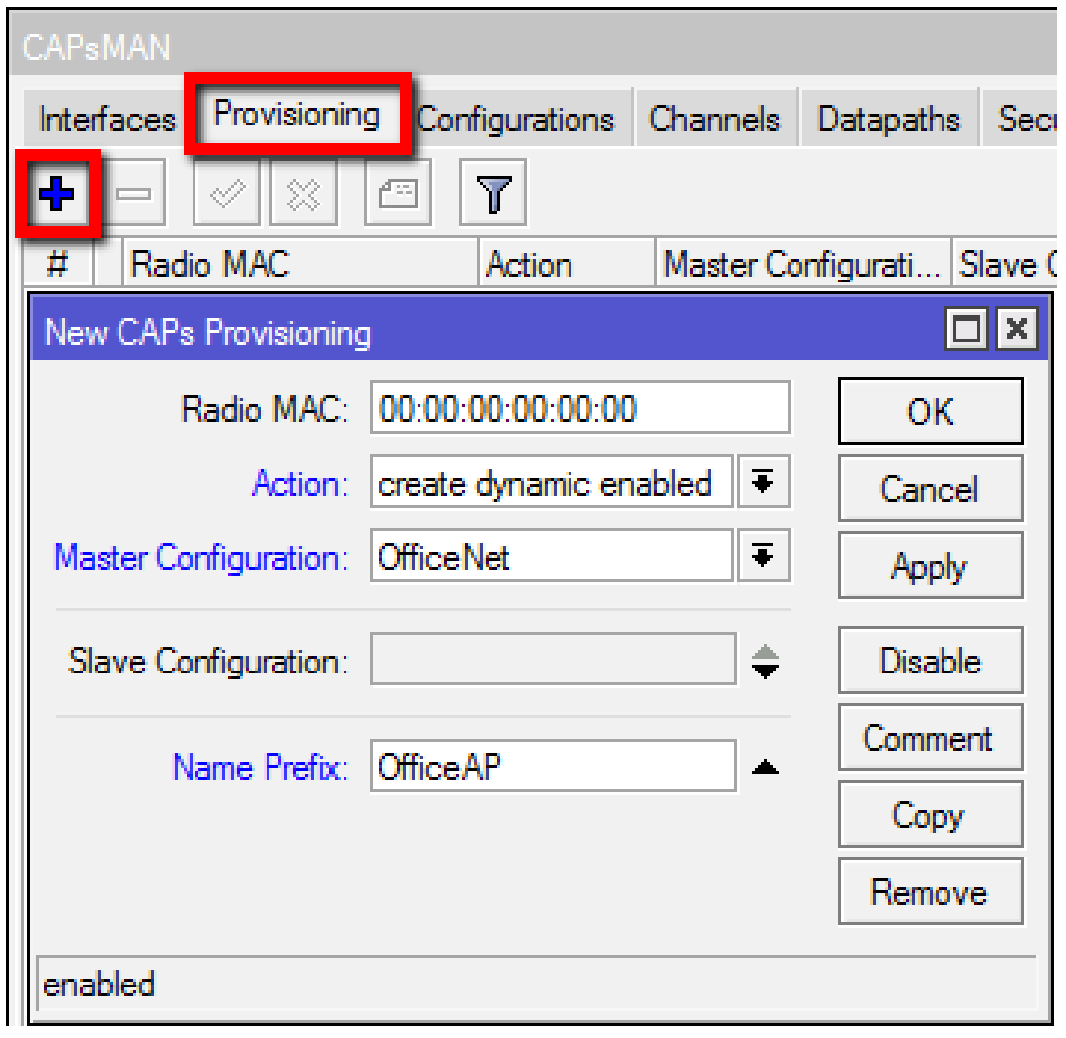
Add a new provisioning rule.

CAPsMAN Server 5

Configuring the CAP

This is a sticky wicket because there are a few options.

Option 1. Using a RouterBoard MAP or CAP

These are purpose built devices and I really like them for new installs.  There is one  design issue I have and that is they have a default config that is suited for a stand alone configuration.  Basically it is a wireless AP with DHCP server on the wlan, DHCP client on the Ethernet, etc.  I would rather it came factory configured to be a CAP.  Clearly then did not consult me.  To turn it into a CAP, there is a hardware option I will cover here.

Note that most CAPs and MAPs come with version 1 of the CAPsMAN software so BEFORE you use the hardware switch to set them to CAP mode, upgrade the CAPsMAN package!

CAP

There is a reset switch located on the underside of the device next to the Ether jack.  Hold it down and apply power via the supplied POE adapter.  Hold it steady for 10 seconds.  The wireless LED will go from flashing to solid.  Then release and it will load the CAP config and look for a controller on the local LAN.  The is a Layer 3 discovery option for when the CAPsMAN is on a different Layer 3 segment or out on the internet somewhere but that  is covered in the wiki as well.

Note: What I have described here is NOT covered correctly in the instruction sheet that comes with the CAP so throw that away and follow my instructions to save a lot of headache.

Within 2-3 minutes the CAP will be in CAP mode.

MAP

There is a reset switch located on the side of the device.  Hold it down and apply power via the supplied POE adapter.  Hold it steady for 10 seconds.  The AP/CAP LED will go from solid to flashing, exactly the opposite of the CAP’s LED behavior.  Standardize guys!  Then release and it will load the CAP config and look for a controller on the local LAN.

Note Again: What I have described here is NOT covered correctly in the instruction sheet that comes with the MAP so throw that away and follow my instructions to save a lot of headache.  Again.

Within 2-3 minutes the MAP will be in CAP mode.

In either case, forget the LEDs and hold the switch exactly 10 seconds and you are good to go..  When you release the switch the LEDs should do a quick blip, 2-3 of them will do it simultaneously telling you it is applying the config.  You will learn to recognize that.  Or not.

Option 2. Converting Non-CAPs or MAPs to CAPs

Simply download the version 2 CAPsMAN and drag it to the files window.  Reboot and then configure the AP by first removing any existing configuration.  Then configure it to be a CAP by using the following script which you can copy and paste to a terminal window:

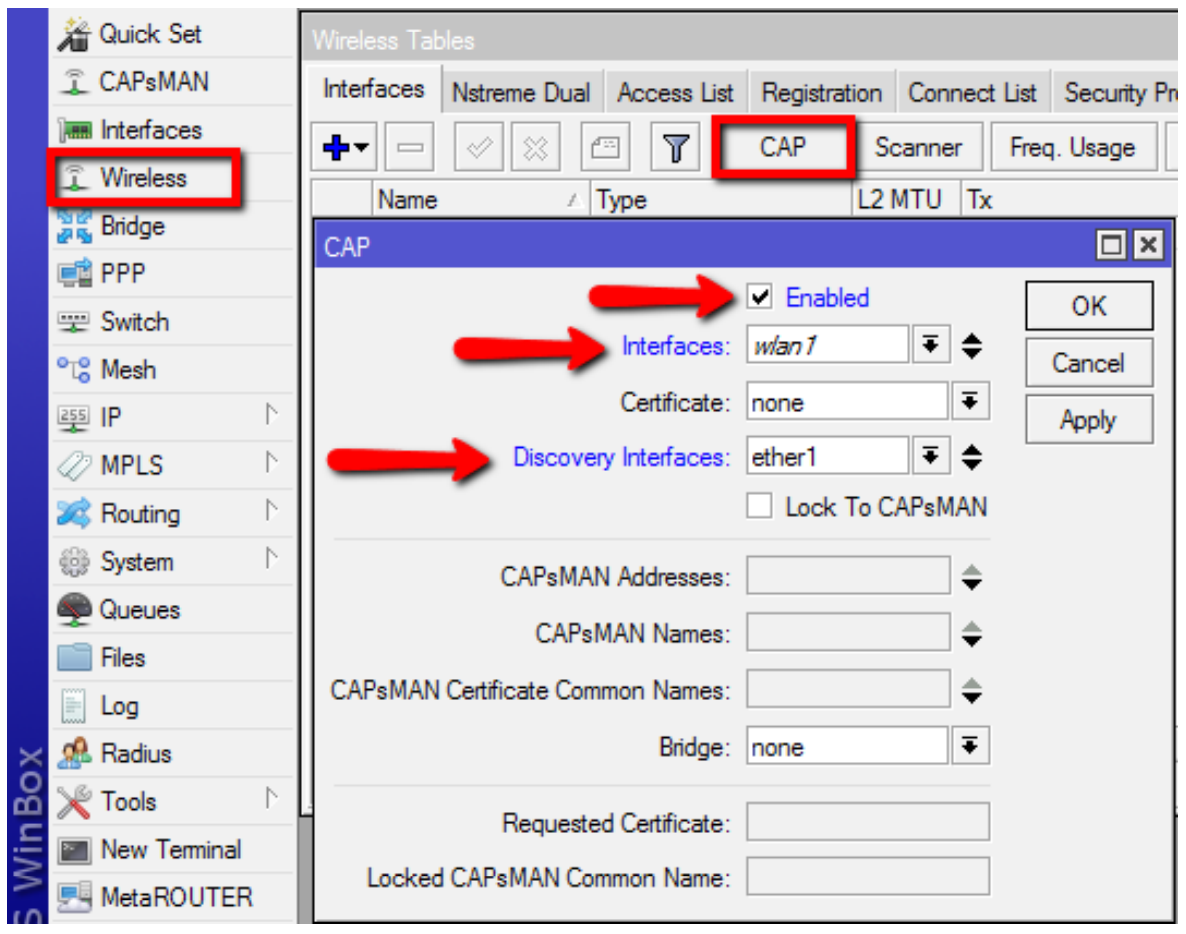
/interface wireless
set [ find default-name=wlan1 ] l2mtu=1600 ssid=MikroTik
/interface wireless cap
set discovery-interfaces=ether1 interfaces=wlan1 enabled=yes
/ip dhcp-client
add default-route-distance=0 dhcp-options=hostname,clientid disabled=no interface=ether1

The device will then communicate with the CAPsMAN and become a CAP.

CAPsMAN Server 6


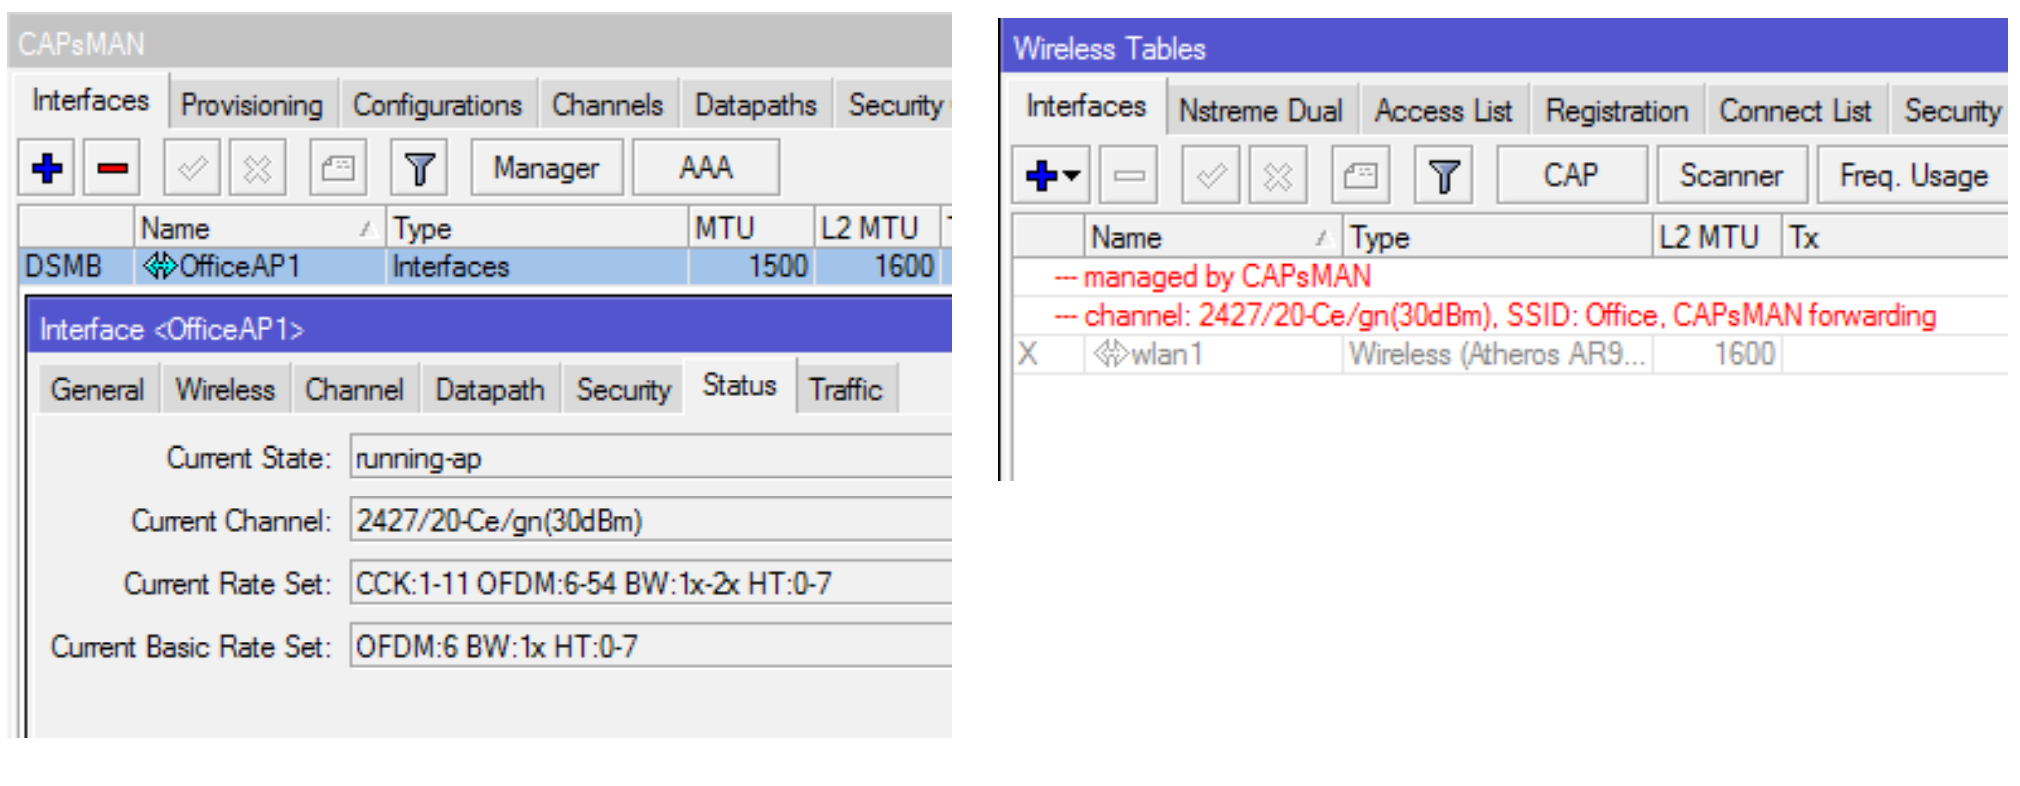
Once the CAP is configured, the CAPsMAN will show it’s status and the CAP will tell you it is being managed by the CAPsMAN;

CAPsMAN Server 7

The registration table will then contain registrations for all CAPs:

CAPsMAN Server 8

There are a lot of modifications you can do at this point like add more SSIDs or optional security keys but this is the basic setup.  Any more CAPs added to the local net will automatically be configured as CAPs as long as they are in CAP mode.

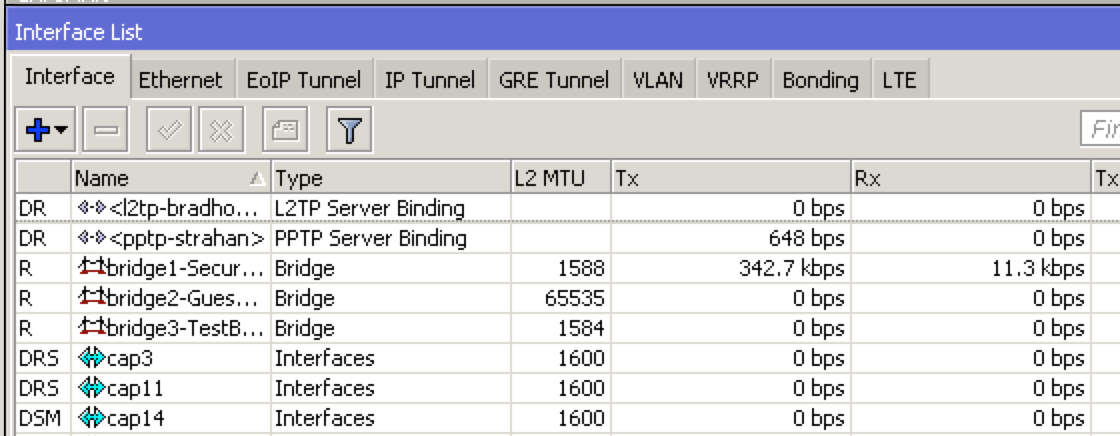
Here’s a screenshot from my router running CAPsMAN.  As you can see the CAPs are just interfaces!  Address them, run HotSpot on them, whatever you would normally do with a physical interface.

Screen Shot 2014-12-02 at 9.08.05 PM

The more I learn, the more I like and I am sure if you give CAPsMAN a try you will like it too!

I used Uldis’ presentation from the MikroTIk USA MUM 2014 to create this how to and he included a lot more detail.  You can ready his presentation HERE.

The manual for CAPsMAN is HERE.


MikroTik RouterOS Virtualization and Bridging Issues – Solved!

It started out simple enough – install MikroTik RouterOS as a guest OS on ESXi and make the virtual router a VPN endpoint for a site to site VPN.

Here is my setup.  On the left is an MikroTik RB2011 and on the right is a virtual instance of MikroTik RouterOS.

MikroTik Virtual RouterOS

As you can see I have an EOIP tunnel between the two routers and I am bridging the Ethernet interface on the LAN to the EOIP tunnel. This yields a Layer 2 connection between the two LANs and accomplishes my goal. Or does it?  Things were acting strange and I could not ping across the tunnel any time I bridged the Ether to the EOIP on the ESX side. No bridge, no problems. With a bridge, no pings.

I was Skyping my friend Tom Smyth in Ireland about an unrelated subject and threatening to pull my hair out when he said “have you tried the 3 security questions on ESXi networking?  No, I replied”.  So, I tried it and the problem was solved. Now everything worked.  Apparently, ESX doesn’t like it’s virtual router interfaces being bridged.  Here are the settings that fixed it.

MikroTik RouterOS-ESX3 MikroTik RouterOS-ESX2 MikroTik RouterOS ESX1

I could care less about the why, nor do I plan to figure it out. It works, and that’s all I care about.


MikroTik RouterOS Packet and Connection Marking

Ever since I wrote the book, RouterOS by Example, I get a lot of emails asking me specific questions about this powerful routing system.  I try and answer the questions, time allowing, as completely as possible.  There is one question that seems to pop up from time to time so I thought it was worth dedicating a blog post to it.

I you are not familiar with the Mangle facility in MikroTik RouterOS, it is a system that allows you to identify traffic and mark it.  The identification criteria can be port, protocol, source address or destination address among other things.  Once traffic is identified, a mark is associated with the packet and that packet can then be queued, firewalled, nat’ted, etc.  to name a few uses.

The question was asked this morning, “Why does everyone suggest marking connections first and then marking packets? Wouldn’t it take less processor power to simply identify and mark the packets with one rule?  Good question so let’s explore that.

If you are in a hurry or have a very simple setup, or if for some reason you have connection tracking turned off, then you can simply mark packets without marking connections.  Although this is quick and dirty, it requires that the router examine every packet that passes through the router and determine if it meets our matching criteria of our one rule.  If you only have a few rules and it works the way you want, then this is probably fine.

For more complicated setups with many rules, this simplistic method will bring a small router to it’s knees by utilizing a huge amount of CPU.  In this case, the best strategy is to first identify the traffic and then mark the connections.

Once the connections are identified and marked, simply mark all packets that belong to that connection.  This is all about numbers so take a look at an example.  My home router currenty shows 118 connections and since I have started writing this post, it has processed more than 13,000 packets.  If you were marking packets only, then the router would have had to examine 13,000 packets to determine if there was a match.  I you use the two step method, it would examine less than 200 connections for a match and then mark only the assiciated packets.  Marking packets in itself is not processor intensive but examining them for a match is.  So, in this case, more rules means less resources.

There is a hidden benefit to marking connections first with respect to troubleshooting.  When you only mark packets, you don’t get a visual feedback about your effectiveness in rule writing.  Yes, the statistics for that rule will increase if you are matching packets, but there is no way to actually see the marks.  On the other hand, if you mark connections first, you will see those marks in the connection tracking table. For me, that in itself is worth the little bit of extra effort.

I hope this helps and happy mangling!


MikroTik, Ubiquiti and WISP Learning Center

This is an idea that has been long in the making, a single repository of technical information where you as a user can go to get the information you need quickly about MikroTik, Ubiquiti or other WISP topics.  Yes, most manufacturers have wiki’s but our is different because we post articles about the most often asked questions, tips and tricks we have learned as WISPs.  Check it out at wiki.ispsupplies.com.
Have a suggestion for an article?  Please let me know by emailing me.

MikroTik Announces 10G Fiber Support

Just when you thought a great product could not get any better, MikroTik has added 10G support for the first time, but in the most obvious place, their CloudCore Router line. The CCR1036-8G-2S+EM is their fastest router, now even faster with two SFP+ ports for 10G interface support (SFP+ module available separately). It uses the same 36 core Tilera CPU as the other CCR1036 model, and delivers the same performance, but now, ten gigabit links are possible. The device comes in a 1U rackmount case, has two SFP+ ports, eight Gigabit ethernet ports, a serial console cable and a USB port.  The CCR1036-8G-2S+ has two SODIMM slots, by default it is shipped with 4GB of RAM, but has no memory limit in RouterOS (will accept and utilize 16GB or more). Also available now, the EM model with 16GB of RAM. Nice!

MikroTik and the Heartbleed Exploit of OpenSSL

MikroTIk and Heartbleed, the official explanation:

All RouterOS versions are secure against the Heartbleed issue.

All versions prior to v6.12 used an unaffected, older version of OpenSSL, and since v6.12 the latest OpenSSL version will be used, where the heartbleed issue is already fixed.

We didn’t use any of the affected OpenSSL versions in any of our products, so no specific action is required on your side.

v2 until v6.11 (included) = secure because use an older OpenSSL version
v6.12 (and above) = secure because use a newer OpenSSL version

5G HP MiMO – MikroTik 5.8Ghz Access Point for Ubiquiti Antennas

But wait. there’s more! Our newly redesigned outdoor enclosure materializes all of the suggestions you have made over the years about this product. The most versatile outdoor enclosure for the MikroTik RouterBOARD 411, 711, 911 and 912 series boards, this new design is all aluminum with WaveGuard’s WaveBlock technology built in and features all stainless steel hardware. New 100% silicone gasket that is seamlessly molded for maximum compression and UV proof makes sure that it will never degrade and never leak. New antenna knockouts features two N-type’s and RJ45 pass-through on the bottom and one N-type and four SMA’s on the top. I really like this little enclosure.  The best part is, unlike other vendors, we don’t make you buy the box, board, pigtails, etc. as a complete kit. You can do that mind you, but if you just want the box, we will sell it to you by itself.

Enclosure Features:

  • All Aluminum
  • WaveBlock Technology
  • No Rivets
  • All Stainless Steel Hardware
  • New Delta Series Mounting
  • Lid Lanyard
  • New Antenna Knockouts

Weatherproof Gasket:

  • 100% Silicone
  • Formulated for Maximum Compression Set
  • UV & Ozone Proof
  • Seamlessly Molded

Here’s a few photos. We have the in stock at ISP Supplies.

MikroTik oe411-1-600MikroTik  oe411-3-600 MikroTik  oe411-2-600

MikroTik oe-411s-6 oe-411s-5 oe-411s-4