
The switch menu and configuration interface is significantly different on the CRS3xx versus the CRS1xx or CRS2xx series switches and if you are trying to configure VLANs, the process is totally different. Here is a quick HowTo for configuring VLANs on MikroTik Switches such as the MikroTik CRS309 and similar.
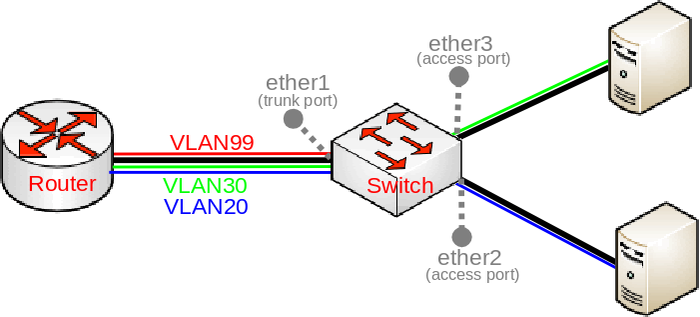
Here is the setup we are trying to create:
Everything is set up through the bridge menu for the most part. Begin with the creation of the bridge and port assignments:
/interface bridge
add name=bridge1
/interface bridge port
add bridge=bridge1 interface=ether1 hw=yes
add bridge=bridge1 interface=ether2 hw=yes pvid=20
add bridge=bridge1 interface=ether3 hw=yes pvid=30
/interface bridge vlan
add bridge=bridge1 tagged=ether1 untagged=ether2 vlan-ids=20
add bridge=bridge1 tagged=ether1 untagged=ether3 vlan-ids=30
add bridge=bridge1 tagged=ether1,bridge1 vlan-ids=99
/interface vlan
add interface=bridge1 vlan-id=99 name=MGMT
/ip address
add address=192.168.99.1/24 interface=MGMT
/interface bridge
set bridge1 vlan-filtering=yes
The lines that people seem to skip over are:
/interface bridge
set bridge1 vlan-filtering=yes
Also, adding the VLAN ID on the access ports when you add them to the bridge don’t forget these statements at the end:
pvid=20
pvid=30
for the two access ports, in this example ether2 and ether3.
Remember that this example only works for CRS3xx series switches. if you have a 1xx or 2xx switch, it is still done through the /switch menu. Here is the same configuration for 1xx and 2xx switches:
/interface bridge
add name=bridge1
/interface bridge port
add bridge=bridge1 interface=ether1 hw=yes
add bridge=bridge1 interface=ether2 hw=yes
add bridge=bridge1 interface=ether3 hw=yes
/interface ethernet switch ingress-vlan-translation
add ports=ether2 customer-vid=0 new-customer-vid=20 sa-learning=yes
add ports=ether3 customer-vid=0 new-customer-vid=30 sa-learning=yes
/interface ethernet switch egress-vlan-tag
add tagged-ports=ether1 vlan-id=20
add tagged-ports=ether1 vlan-id=30
add tagged-ports=ether1,switch1-cpu vlan-id=99
/interface ethernet switch vlan
add ports=ether1,ether2 vlan-id=20 learn=yes
add ports=ether1,ether3 vlan-id=30 learn=yes
add ports=ether1,switch1-cpu vlan-id=99 learn=yes
/interface vlan
add interface=bridge1 vlan-id=99 name=MGMT
/ip address
add address=192.168.99.1/24 interface=MGMT
/interface ethernet switch
set drop-if-invalid-or-src-port-not-member-of-vlan-on-ports=ether1,ether2,ether3
I hope this post saves you some time and head scratching!