DHCP Option 43 on MikroTik RouterOS With Ruckus

This one nearly made me tear my hair out. Option 43 is a vendor specific option that many vendors use to tell their devices the IP address of a server they need to access. Ubiquiti UniFi uses it and so does in this case Ruckus. I tried setting the value using a hex generator to no avail and after an email through a friend from a Ruckus engineer, we now have a tool!

Try THIS link to access the tool. I have not yet confirmed it works with Ubquiti UniFi but will try it next. It has the proper syntax for the raw option and Cisco as well.  I think it likely will. Enjoy!

EdgeMAX – VLAN Walkthrough with EdgeSwitch

Obviously there are more detailed instructions on the Ubiquiti site but I just needed a trunk port and a few access ports on my Ubiquiti EdgeSwitch so this is a much for my own documentation as it is for you my valuable customers!

  1. Connect the Admin Computer to a switch port, then navigate to 192.168.1.2 in your web browser.
  2. Note: Make sure that PoE is disabled on this port prior to connecting your device.
  3. Under Switching > VLAN > Status, click Add the vlan to the the EdgeSwitch.  You can also add several vlans at once using a range like this:

original


4. Assuming I want port 1 to be a trunk port, while still under Switching > VLAN > Port Configuration, select 2 from the dropdown menu for VLAN ID.

original-3

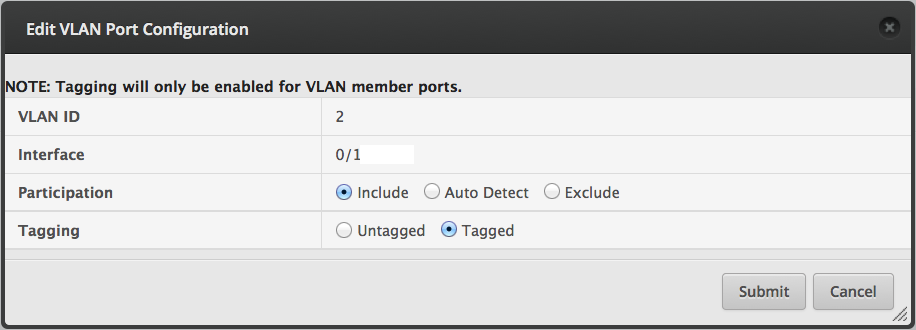
5. Then select Ports 0/1 (the trunk port) and apply the following configuration:

original-2


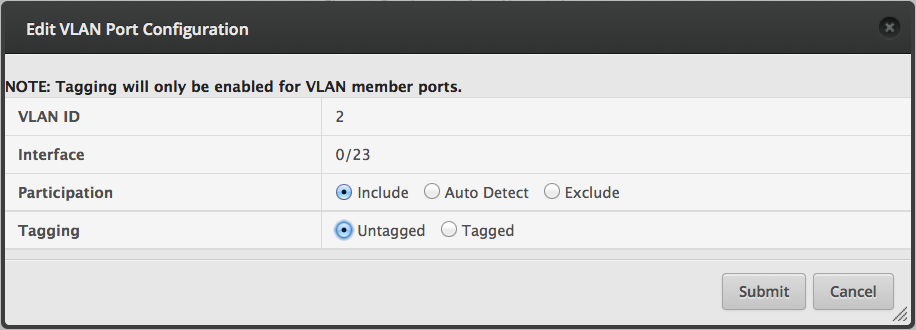
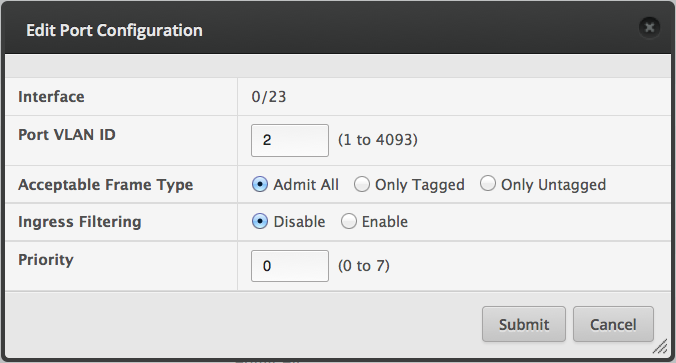
6. Then select Port 0/23 (the access port for UVC belonging to  VLAN2) and apply the following configuration:

original-4

7. Next, navigate to Switching > VLAN > Port Summary, select All from the Display rows dropdown menu. Then select Port 0/23, click Edit, then apply the following configuration:

original-5

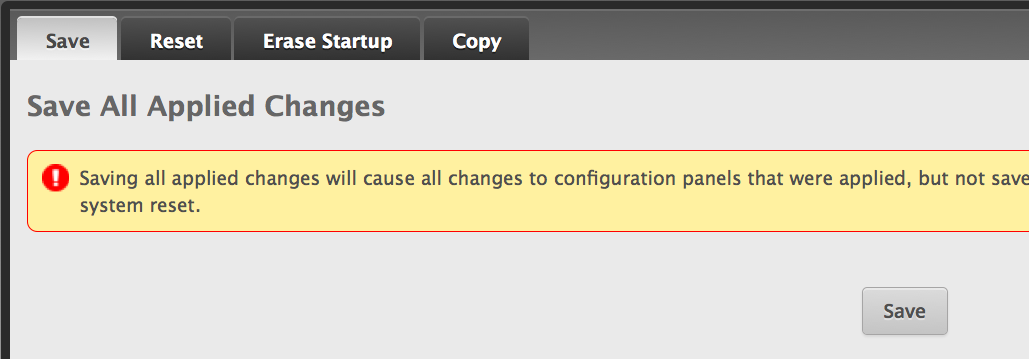
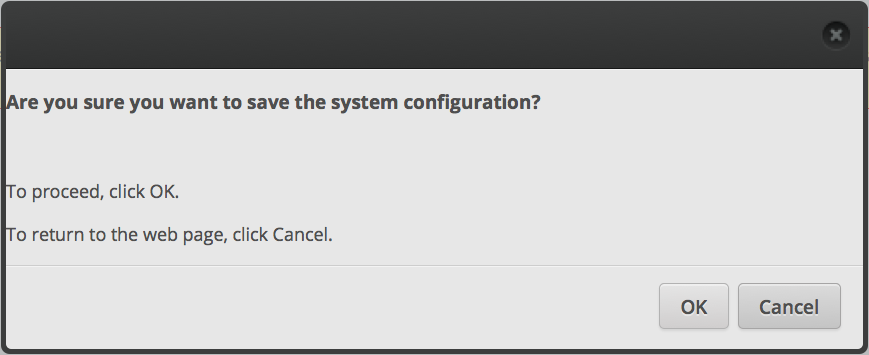
8. Finally, click the Save Configuration button at the top-right of the screen to apply the active configuration to the boot configuration, then follow the prompts that appear.

 original-6original-7 original-8That’s it!

MikroTik Wireless CAPsMAN Howto

I was intrigued by the recently new feature being developed by MikroTik called “CAPsMan”.  From the wiki “Controlled Access Point system Manager (CAPsMAN) allows centralization of wireless network management and if necessary, data processing. When using the CAPsMAN feature, the network will consist of a number of ‘Controlled Access Points’ (CAP) that provide wireless connectivity and a ‘system Manager’ (CAPsMAN) that manages the configuration of the APs, it also takes care of client authentication and optionally, data forwarding.  When a CAP is controlled by CAPsMAN it only requires the minimum configuration required to allow it to establish connection with CAPsMAN. Functions that were conventionally executed by an AP (like access control, client authentication) are now executed by CAPsMAN. The CAP device now only has to provide the wireless link layer encryption/decryption.”

When I initially read that, I immediately thought of UniFi, Ubiquiti’s centrally managed enterprise wireless platform.  From that point forward, I spent little time learning the facts and immediately began comparing the product to UniFi only to find I was disappointed with CAPsMAN and why wouldn’t I be?  It had no web interface, no fancy graphs and seemed difficult to configure.  I was wrong.  I am not saying there is eye candy, because there isn’t but it’s beauty is in it’s innovation, and function over form.  Best of all it can be built using existing, already deployed hardware, thereby using software to redefine your wireless network.

In summary, the CAPsMAN concept involves using your existing internet router (must be a MikroTik of course) and adding the optional CAPsMAN package.  Then installing theCAPsMAN package on the AP devices.  Conventional AP’s become CAPs and the router serves as the CAPsMAN controller and you are off to the races.  Each CAP becomes simply an interface on the router.  An interface you can bridge, address, route, whatever, treat it like any other interface.  Want to know who is associated with a certain AP?  Check the main CAPsMAN registration page.  There is one page that summarizes all CAPs!  Want to add a secondary or third ( I don’t like the word tertiary) , easy, just add it in CAPsMAN and it pushes the config to all the CAPs.  Same thing with adding a new WPA key, click once, type, click ok and done, all CAPs get configured automatically.

Hopefully I have wet your appetite enough for you to dive in and try it so here is a step by step to get you going.   Everything else is a modification of this basic setup.

CAPsMan HowTo

First, you must install thee CAPsMAN wireless package on the router and all AP’s.  If using CAPs, this is already done for you.  However, must CAPs come with CAPsMAN version 1 and you want version 2 so download it from MikroTIk.com, drag the file to your files window and reboot all devices.

CAPsMAN Router

Once the router has the CAPsMAN package, open Winbox and enable the CAPsMAN manager service.
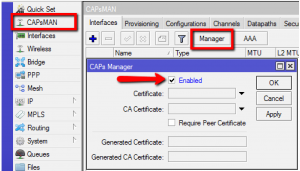
CAPsMAN Server1

Next create a bridge interface for the CAPs to be added to dynamically when they appear on the network.
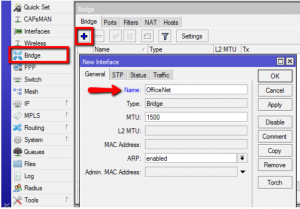
CAPsMAN Server2

Add an IP address, DHCP Server and a NAT rule.  You can learn how to do this elsewhere, like wiki.mikrotik.com for example.
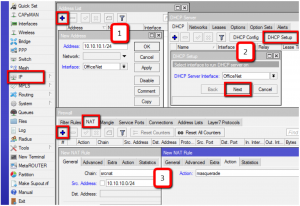
CAPsMAN Server 3

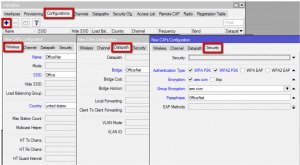
Add a new CAPsMAN configuration.

CAPsMAN Server 4

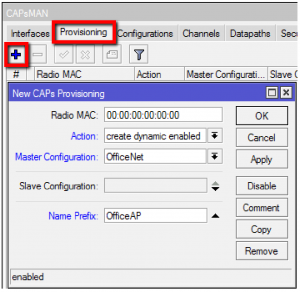
Add a new provisioning rule.

CAPsMAN Server 5

Configuring the CAP

This is a sticky wicket because there are a few options.

Option 1. Using a RouterBoard MAP or CAP

These are purpose built devices and I really like them for new installs.  There is one  design issue I have and that is they have a default config that is suited for a stand alone configuration.  Basically it is a wireless AP with DHCP server on the wlan, DHCP client on the Ethernet, etc.  I would rather it came factory configured to be a CAP.  Clearly then did not consult me.  To turn it into a CAP, there is a hardware option I will cover here.

Note that most CAPs and MAPs come with version 1 of the CAPsMAN software so BEFORE you use the hardware switch to set them to CAP mode, upgrade the CAPsMAN package!

CAP

There is a reset switch located on the underside of the device next to the Ether jack.  Hold it down and apply power via the supplied POE adapter.  Hold it steady for 10 seconds.  The wireless LED will go from flashing to solid.  Then release and it will load the CAP config and look for a controller on the local LAN.  The is a Layer 3 discovery option for when the CAPsMAN is on a different Layer 3 segment or out on the internet somewhere but that  is covered in the wiki as well.

Note: What I have described here is NOT covered correctly in the instruction sheet that comes with the CAP so throw that away and follow my instructions to save a lot of headache.

Within 2-3 minutes the CAP will be in CAP mode.

MAP

There is a reset switch located on the side of the device.  Hold it down and apply power via the supplied POE adapter.  Hold it steady for 10 seconds.  The AP/CAP LED will go from solid to flashing, exactly the opposite of the CAP’s LED behavior.  Standardize guys!  Then release and it will load the CAP config and look for a controller on the local LAN.

Note Again: What I have described here is NOT covered correctly in the instruction sheet that comes with the MAP so throw that away and follow my instructions to save a lot of headache.  Again.

Within 2-3 minutes the MAP will be in CAP mode.

In either case, forget the LEDs and hold the switch exactly 10 seconds and you are good to go..  When you release the switch the LEDs should do a quick blip, 2-3 of them will do it simultaneously telling you it is applying the config.  You will learn to recognize that.  Or not.

Option 2. Converting Non-CAPs or MAPs to CAPs

Simply download the version 2 CAPsMAN and drag it to the files window.  Reboot and then configure the AP by first removing any existing configuration.  Then configure it to be a CAP by using the following script which you can copy and paste to a terminal window:

/interface wireless
set [ find default-name=wlan1 ] l2mtu=1600 ssid=MikroTik
/interface wireless cap
set discovery-interfaces=ether1 interfaces=wlan1 enabled=yes
/ip dhcp-client
add default-route-distance=0 dhcp-options=hostname,clientid disabled=no interface=ether1

The device will then communicate with the CAPsMAN and become a CAP.
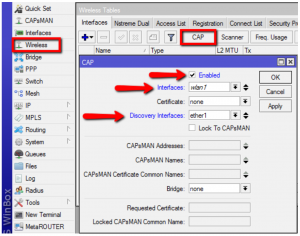
CAPsMAN Server 6


Once the CAP is configured, the CAPsMAN will show it’s status and the CAP will tell you it is being managed by the CAPsMAN;
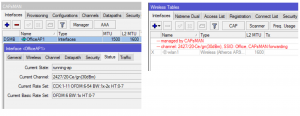
CAPsMAN Server 7

The registration table will then contain registrations for all CAPs:
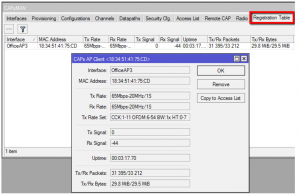
CAPsMAN Server 8

There are a lot of modifications you can do at this point like add more SSIDs or optional security keys but this is the basic setup.  Any more CAPs added to the local net will automatically be configured as CAPs as long as they are in CAP mode.

Here’s a screenshot from my router running CAPsMAN.  As you can see the CAPs are just interfaces!  Address them, run HotSpot on them, whatever you would normally do with a physical interface.
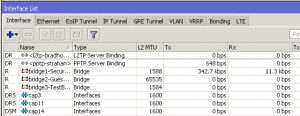
Screen Shot 2014-12-02 at 9.08.05 PM

The more I learn, the more I like and I am sure if you give CAPsMAN a try you will like it too!

I used Uldis’ presentation from the MikroTIk USA MUM 2014 to create this how to and he included a lot more detail.  You can ready his presentation HERE.

The manual for CAPsMAN is HERE.


RF Elements Simper Radio Antennas

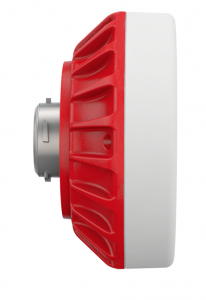
In a surprise announcement yesterday at the WISPA Wispalooza in Las Vegas, RF Elements, one of my favorite manufacturers made a game changing announcement about their new product line, the RF Elements Simper.  The name is a shortened version of “Simply Perfect Radio” and is a bit hard for me to say, but the idea is fantastic.  Again, not yet a huge fan of the name, sorry JT.  I think it will grow on me though.

A picture is worth a thousand words, so here are a few, then we will discuss. Click on each to enlarge.

RFElementsSimper1 RFElementsSimper2 RFElementsSimper3 RFElementsSimper4


In summary, this is a new product line that centers around the top three WISP radios on the market: MikroTik, Ubiquiti and Cambium.  The premise of the system is that we standardize the RF connection between the radio and the antenna by using a new design that eliminates coaxial cables and replaces them with a no-loss waveguide, just like the licensed links have always used.  With a single twist lock mount, we can create numerous antenna designs that will work with any manufacturer’s radio for which we have a suitable enclosure or adapter.  It’s simplicity mated with maximum performance and reduced loss.  Like everything RFE does, the cases will be molded, ergonomic, clean, waterproof and thoughtfully designed.

Here are some of the many features they are touting:

NO LOSS

The connection with antennas via original TwistPort connector is virtually lossless.

Scalable

Simper is highly scalable concept of simplistic radios combined with wide range of antennas.

Easy

Deployment of Simper radio is a simple “twist and snap” to an antenna.

Multiplatform

Simper comes in multiple models running different OS. No need to migrate to new wireless platform.

Simple

Simper is compact and essentially simple product delivering the best wireless performance.

Cost Effective

Simper is the best cost performing wireless networking product today.

The New Approach

Simper unveils new concept of highly scalable wireless equipment.
Simper is the perfect match to growing requirements on performance, versatility and cost effectivity.

TwistPort Connector

Simper radios feature TwistPort Connector, our original quick-locking waveguide port. Connection and disconnection is brilliantly simple and can be done with one hand. TwistPort is the key feature to Simper scalability and performance.

NO LOSS

TwistPort Connector is virtually lossless. There are no traditional RF connectors or RF cables, that cause signal loss. TwistPort compatible antenna products include Symmetrical Sectors and UltraDish TP Antennas.

EASY DEPLOYMENT

When Using TwistPort Connector, deployment of Simper radio is a simple “twist and snap” to an antenna.

Simper Radio Adaptors

Simper Radio Adaptor make traditional connectorized radios compatible with TwistLock. Integration is simple, intuitive and requires no tools.
Adaptors will mate with most popular connectorized radios as UBNT Rocket M5, UBNT Rocket 5ac and Cambium Networks ePMP1000 connectorized radios.

What is Symmetrical Sector?

Symmetrical Sector antennas have symmetrical beam pattern in both horizontal and vertical panes.
The beam pattern does not vary with frequency, and antenna gain is balanced over wide frequency range.
Symmetrical Horn antennas are low loss and have attenuated side radiation lobes. These features make them excellent for use as Sector antennas.

SYMMETRICAL SECTOR BENEFITS

MORE COVERAGE

Symmetrical Sectors cover more area than traditional Sectors with narrow vertical beamwidth.

NO NULL

Symmetrical Sectors have no issues with connecting close clients.

EASY CO-LOCATION

As a result of very low sidelobes of horn antennas, Symmetrical Sectors are ideal for cluster deployments and co-location.

TWISTPORT CONNECTOR

Connecting Simper Radios to Sector Antennas is a simple “twist and snap”.

COMPACT SIZE

Symmetrical Sector antennas are compact and easy to mount virtually anywhere

WEATHERPROOF

Made of the best weather resistant materials as aluminium, plastic and st. steel.

That’s a lot of benefits and features and you can read more HERE.  We have already placed our stocking order as a RF Elements Master Distributor and I will notify you when they are here.  Get ready, I promise this innovation will change the  WISP game.

Ubiquiti UniFi Video Cameras, Another Cool Video Captured

I have blogged several times about how nice the Ubiquiti airVision NVR and the airVision cams are for ease of setup and great value but the UniFi Video cameras take it one step farther.  Not only do they have night vision, but the sound is really cool.  This week I was luck enough to capture a video of a bull elk bugling at his harem in Estes Park, Colorado, the home of the Elk rut.  This one needs no more explanation so turn up the speakers and enjoy!


MikroTIk RouterOS CAPsMAN

Here are the notes from Uldis Cernevskis presentation at the US MUM in Pittburgh, PA.

MikroTik CAPsMAN is a wireless provisioning and management system for MikroTIk wireless AP’s.

Controlled Access Point system Manager (CAPsMAN) allows centralization of wireless network management and if necessary, data processing. When using the CAPsMAN feature, the network will consist of a number of ‘Controlled Access Points’ (CAP) that provide wireless connectivity and a ‘system Manager’ (CAPsMAN) that manages the configuration of the APs, it also takes care of client authentication and optionally, data forwarding.

When a CAP is controlled by CAPsMAN it only requires the minimum configuration required to allow it to establish connection with CAPsMAN. Functions that were conventionally executed by an AP (like access control, client authentication) are now executed by CAPsMAN. The CAP device now only has to provide the wireless link layer encryption/decryption.

There is not narrative, just a brain dump.

CAPsMAN Features

  • CapsMan is a centralized management of RouterOS AP’s
  • Dual band support
  • provisioning
  • Certificate support
  • Radius MAC Authentication
  • Custom config support
  • Layer 3 management of off site AP’s

Requirements

  • Newest version 6 version
  • Wireless-fp package installed

Setup

  • Enable CAPSMAN Service
  • Create abridge
  • Add IP to bridge
  • Create CAPsMAN Configuration
  • Create provisioning rule
  • Enable CAP mode on AP’s

Other Features

  • Works on MAC layer 2 or UDP via layer 3
  • CAP attempts to contact a CAPsMAN and is listed in the CAP list


If You Haven’t Yet Registered Yet, You Might Get Left Out

Hard to believe but the USA MikroTik User’s Meeting is week after next.  If you have never attended a training the week of the MUM, you are really missing something cool.  Why you ask?

  1. Since training is Monday through Wednesday, you will arrive at the MUM hotel more than 3 days before anyone else, get acclimated, and find the best places to eat and drink.
  2. MikroTik engineers will also arrive early so you get the first opportunity to meet them in person and discuss your specific applications with the guys that design the products you use over lunch or a drink.
  3. By arriving early, you will be first in line for the registration table and get your free router before anyone else.  I suspect you will be the first into the reception hall as well!
  4. Most importantly, you get to participate n three days of intensive MikroTik training with me and earn your MTCNA certification.

If you already have your MTCNA, why not come and re-certify?  Your certificate is only good for three years so this could be your year to get re-certified and get up to date on RouterOS.

If I still haven’t convinced you, how about a free voucher for the MUM itself?  I still have a few available, just register for my class and once registered, email me and I will send you one free voucher to attend the MUM.

I hope you are convinced, and I look forward to meeting each of you at the USA MikroTik MUM in Pittsburgh, Pa. Learn More…

450 MBps MikroTIk 802.11ac Wireless Link for $200, Really?

MikroTik’s new 802.11ac SXT devices achieve speed tests of more than 450 MBps. Check out the video.

Room test, 5 meters apart. From/To SXT unit.
This shows nearly maximum possible performance, hardware wise. The performance will be different based on distance and environment, this example only shows that could be possible in ideal conditions. Actual outdoor tests will follow later.

Want to learn more about IEEE 802.11ac?  Read more…

Ubiquiti airVision, airCams & “Unsupported Firmware” Errors

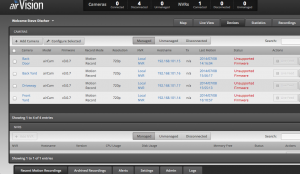
I have always been a big fan of the Ubiquiti AirVision-2 software and especially the  AirVision-C NVR.  I have an installation at my office, my home and my cabin in Colorado.   Many of you have seen the images and video I have captured of the huge Elk that hang out at our cabin in Estes Park.  Today, I went to check on our home in Texas and I was greeted by this:
Screen Shot 2014-07-14 at 7.47.17 AM
“Unsupported Firmware” simply means the version of firmware running on the cameras is no longer compatible with AirVision.  In my case this happened automatically because I had the settings configured to automatically check for firmware updates and install them.

When Ubiquiti introduced the UniFi cameras, they also released UniFi Video, not compatible with airVision firmwares.  Apparently, there is no mechanism in place to prevent the upgrade to the UniFi Video software so the cameras upgraded and thereby broke my airVision installation.  Of course, I have the auto-upgrade feature enabled at all three locations so it was time to upgrade my airVision NVR appliances, X 3.

Since Ubiquiti uses Debian Linux as the operating system for their NVR, the first step is always to upgrade the base OS.  The ensure the new Ubiquiti software has access to the latest libraries and especially to the latest Java.

To upgrade the OS, it is a two step process.  First is to issue a command that checks for and makes a list of up-datable packages and secondly to actually download and install the updates.  This needs to be done from the command line, so if you are running Windows, you will need to download an SSH terminal emulator like Putty.  Putty.exe can be downloaded with a quick Google search and is a stand alone executable.

In the address blank in Putty, type the IP address of your airVision NVR and click connect.  The default user name is root and the password is ubnt.
If you have changed the default credentials, you are on your own.  Once you have the shell open, execute the following command:

apt-get update

This will work for a while and return you to the shell command prompt.  Next, issue:

apt-get upgrade

This is an interactive command and will ask for confirmation to download and install the updates.

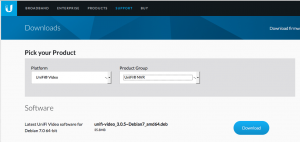
Once the update is done, 5-10 minutes depending on your connection speed, and you have been returned to the command prompt. Next you need to download the unifi-video software from https://www.ubnt.com/download/. The one you want is for Debian:

Screen Shot 2014-07-14 at 10.11.33 PM

Since you have downloaded the file to your laptop, you need to get it to the NVR. I use scp under Mac, but you can use FileZilla, a free FTP/SCP client.  Using Filezilla, upload the file to the NVR.  The directory /root is as good a place as any to store it.  Once you have the update file on the NVR, issue the following commands to install the UniFi Video upgrade:

sudo dpkg -i unifi-video*.deb; sudo apt-get install -f

Once the upgrade is done, you will no longer have airVision, but instead, have the newer and upgraded UniFi Video.  All videos will be transferred and converted and you should not lose any settings.

All three upgrades went flawlessly using this method but the eternal pessimist should make a copy of his or her /usr/lib/unifi directory prior to the upgrade.  You can make a tar backup using this command:

tar -cfz /usr/lib/unifi /usr/lib/unifi.tar.gz

If you don’t know what tar is or how to recover using a tar file, find a friend that knows Linux or seek help on the Ubiquiti forums.

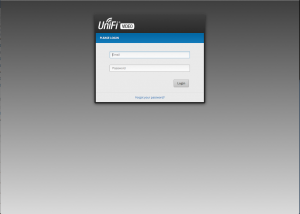
Once the upgrade is done and the existing videos have been upgraded (again, this could take 5-10 minutes), you should get a revised login screen like this:

Screen Shot 2014-07-14 at 10.17.50 PM

As usual, your mileage may vary and I am sure there will be exceptions but this one worked for me as written.  If you have issues, the forums are always a good place to start. Good luck and enjoy Ubiquiti UniFi Video.