New MUM events and webpage

They have added several new MikroTik User Meetings to the schedule this year.

MikroTik is coming to:
• USA in September (Pittsburgh, PA)
• Bolivia in November (Santa Cruz)
• Brazil in November (Fortalez)
• Indonesia in December (Yogyakarta)

They have also launched a brand new MUM website where you can get the latest information about these events, and register to attend the conference.

MikroTik is introducing CAPsMAN

This is a new feature in RouterOS, which allows to remotely manage your Access Point devices, without need to connect to each of them. Set a device to CAPs mode and it will be automatically discovered and provisioned. Simply change one setting, and all your CAPs (controlled APs) will instantly have the new setting.
The CAPsMAN runs on any RouterBOARD, so no additional hardware is needed, including legacy devices with a simple upgrade.
The CAPsMAN system allows quick deployment of large networks, new RouterBOARD devices will come CAPsMAN ready from the factory, you will be able to add them to the CAPsMAN network with a simple push of a button.
The CAPsMAN works both with Layer 2 and Layer 3 connection between CAPs manager and your APs, and what’s more, not only can it manage the configuration of your APs, optionally it can also manage all their traffic. More information in our manual.
The CAPsMAN feature is available separately in the “wireless-FP” package for RouterOS v6.13, and starting with RouterOS v6.14 it will be included in the standard upgrade package as a one click option to enable.

MikroTIk Adds Power Cycling Feature for POE

In RouterOS v6.12 MikroTik has added a new feature, that allows your RouterBOARD PoE-out ports to reset the power for specified duration, for power cycling a connected device. This is useful if you want to powercycle a device that you are connecting from. This feature is supported in the following devices: RB2011Ui, RB951Ui, RB750UP, OmniTIK UPA, mAP, RB2011iL. ISP Supplies is the second largest USA MikroTik distributor. See the full MikroTik Router line at ISP Supplies.

MikroTik RouterOS Virtualization and Bridging Issues – Solved!

It started out simple enough – install MikroTik RouterOS as a guest OS on ESXi and make the virtual router a VPN endpoint for a site to site VPN.

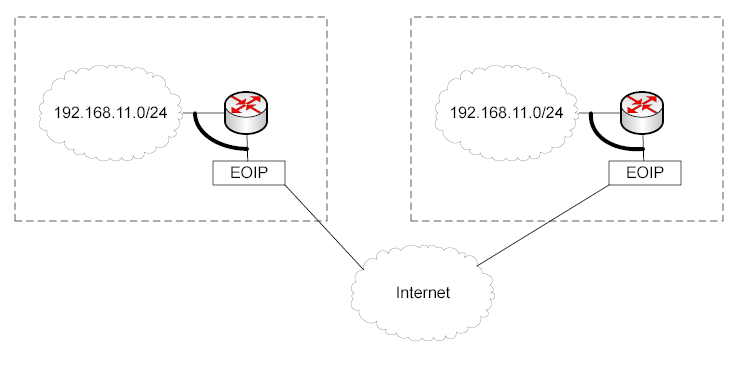
Here is my setup.  On the left is an MikroTik RB2011 and on the right is a virtual instance of MikroTik RouterOS.

MikroTik Virtual RouterOS

As you can see I have an EOIP tunnel between the two routers and I am bridging the Ethernet interface on the LAN to the EOIP tunnel. This yields a Layer 2 connection between the two LANs and accomplishes my goal. Or does it?  Things were acting strange and I could not ping across the tunnel any time I bridged the Ether to the EOIP on the ESX side. No bridge, no problems. With a bridge, no pings.

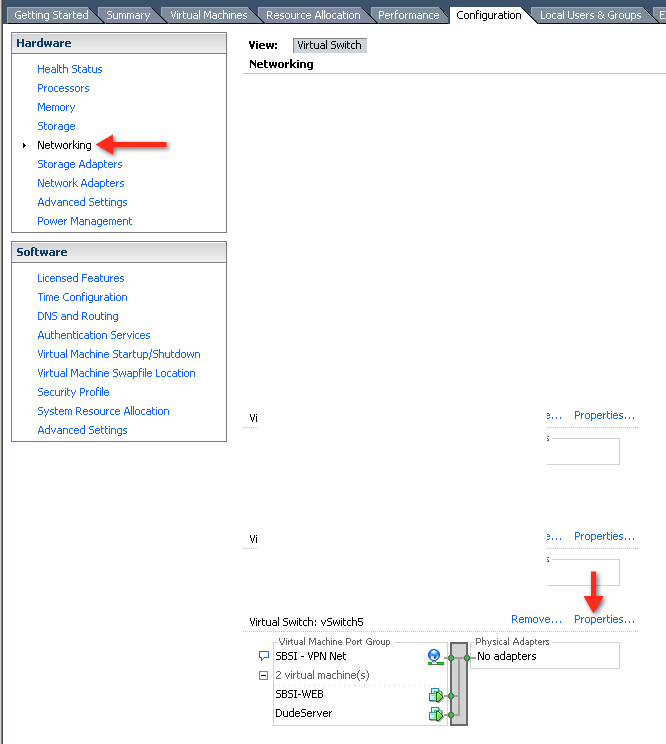
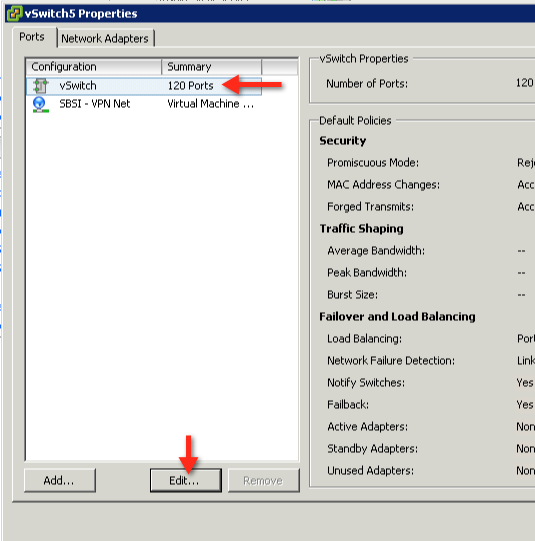
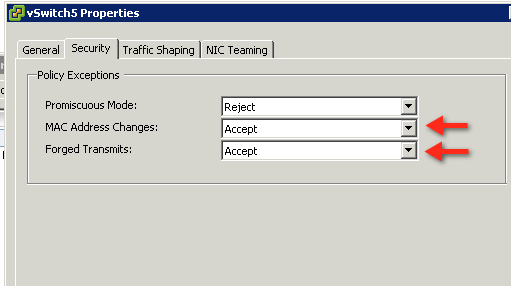
I was Skyping my friend Tom Smyth in Ireland about an unrelated subject and threatening to pull my hair out when he said “have you tried the 3 security questions on ESXi networking?  No, I replied”.  So, I tried it and the problem was solved. Now everything worked.  Apparently, ESX doesn’t like it’s virtual router interfaces being bridged.  Here are the settings that fixed it.

MikroTik RouterOS-ESX3 MikroTik RouterOS-ESX2 MikroTik RouterOS ESX1

I could care less about the why, nor do I plan to figure it out. It works, and that’s all I care about.


MikroTik RouterOS Packet and Connection Marking

Ever since I wrote the book, RouterOS by Example, I get a lot of emails asking me specific questions about this powerful routing system.  I try and answer the questions, time allowing, as completely as possible.  There is one question that seems to pop up from time to time so I thought it was worth dedicating a blog post to it.

I you are not familiar with the Mangle facility in MikroTik RouterOS, it is a system that allows you to identify traffic and mark it.  The identification criteria can be port, protocol, source address or destination address among other things.  Once traffic is identified, a mark is associated with the packet and that packet can then be queued, firewalled, nat’ted, etc.  to name a few uses.

The question was asked this morning, “Why does everyone suggest marking connections first and then marking packets? Wouldn’t it take less processor power to simply identify and mark the packets with one rule?  Good question so let’s explore that.

If you are in a hurry or have a very simple setup, or if for some reason you have connection tracking turned off, then you can simply mark packets without marking connections.  Although this is quick and dirty, it requires that the router examine every packet that passes through the router and determine if it meets our matching criteria of our one rule.  If you only have a few rules and it works the way you want, then this is probably fine.

For more complicated setups with many rules, this simplistic method will bring a small router to it’s knees by utilizing a huge amount of CPU.  In this case, the best strategy is to first identify the traffic and then mark the connections.

Once the connections are identified and marked, simply mark all packets that belong to that connection.  This is all about numbers so take a look at an example.  My home router currenty shows 118 connections and since I have started writing this post, it has processed more than 13,000 packets.  If you were marking packets only, then the router would have had to examine 13,000 packets to determine if there was a match.  I you use the two step method, it would examine less than 200 connections for a match and then mark only the assiciated packets.  Marking packets in itself is not processor intensive but examining them for a match is.  So, in this case, more rules means less resources.

There is a hidden benefit to marking connections first with respect to troubleshooting.  When you only mark packets, you don’t get a visual feedback about your effectiveness in rule writing.  Yes, the statistics for that rule will increase if you are matching packets, but there is no way to actually see the marks.  On the other hand, if you mark connections first, you will see those marks in the connection tracking table. For me, that in itself is worth the little bit of extra effort.

I hope this helps and happy mangling!


MikroTik, Ubiquiti and WISP Learning Center

This is an idea that has been long in the making, a single repository of technical information where you as a user can go to get the information you need quickly about MikroTik, Ubiquiti or other WISP topics.  Yes, most manufacturers have wiki’s but our is different because we post articles about the most often asked questions, tips and tricks we have learned as WISPs.  Check it out at wiki.ispsupplies.com.
Have a suggestion for an article?  Please let me know by emailing me.